Sunday, August 27, 2017

My Mayo Will Make Your Mayo Sad. With Sadness.

I've had problems with mayonnaise. For years I did just what Julia Child told me and no problems. Then I moved and because of stuff I didn't have space for my blender. Now I can't follow JC's instructions. I know there are many ways to make mayo, and I have been told that the food processor works just fine. I beg to differ. I tried making an herbed mayo sauce and it split and I added an egg and tried again and it still split and I just threw it out. 

Things that make mayo:

Whisks
Blenders
Stick Blenders

I'm now using my stick blender, it works great, just use a small bowl. 

I was talking with some chefy type people and they were saying they have trouble getting their mayo not to split and I asked if they were measuring their oil. They were. This is fine, if you also measure your egg yolk. Eggs are not exactly the same and they vary from chicken to chicken and egg to egg. This means that you can't say two yolks to a cup of oil and have mayo come out. I actually have no idea what the ratio is supposed to be, I do it like JC said to, I add oil until it's done. So, if you want to measure, look up the amount of yolk you should have to oil, come on, it's the future, and you can go dance in the field. 

Today, I decided to pasteurize some eggs, as my theory is that the mayo will be good for longer. Sous vide, not hard, you poach them at like 135 or so for about 2 hours. While this was going on, I decided that I would make an infused oil. Infused oils cook for about an hour around 120-130 so I figured this was fine. 

Real quick, let's talk food safety. It's not something to sniff at. Listen up. Raw eggs can be dangerous to some people. And that information is private to those people (age, medical conditions, ect.), so you don't know who they are. I mean you might, if you look at that 2 year old and then offer him a deviled egg you made with your own mayo and then think, huh. If you plan to serve your homemade egg based salad dressing or mayo, pasteurize your eggs. Also, when you make oil infusions there is the chance that you can get botulism from them. You know the stories for people who died from eating the beans? That's not messing around. So, minimize risk. Wash your herbs and dry them (you know, oil doesn't get along with water), garlic needs to be used with caution and the result not kept around for long periods of time, or frozen; keep in the fridge. That being said I've made non sous vide oils with low heat before from fresh herbs and had no problems. I'm not having problems now. I don't want to scare you, I want you to be cautious. I blanch my garlic before use, and you should too, also it makes it easy to peel. 

Between these two things I have made a topping for my various foods (I like a Mexi egg omelette in the morning and this will keep me from wishing I had sour cream).

So let's get to it. 
You can tell he's pasteurized because he's marked. 

Sous Vide Pasteurized Eggs


Follow your sous vide instructions and heat the thing up to 135 and set the timer for 2 hours. Add the eggs in the shell. I put mine in a little bag with some water around them and attached them to the edge of the pot to make them easy to pull out. Remove, ice bath, mark. 


The Most Mexican Spiced Mayo


3 cloves garlic, crushed
1 jalapeno, diced
1/3 bunch cilantro chopped (stems too)
3 tsp Mexican oregano
2 tsp Ground cumin (I didn't have it but whole cumin is better just toast it in a pan first)
About 1/3-1/2 cup avocado oil

Avocado oil
1 lime
1 tsp the plainest mustard you can get
salt
1 pasteurized egg

Put the garlic, jalapeno, cilantro, oregano and cumin in a bag suited for sous viding. I use seal a meal for these as you don't want ANY air in the bag. Add the spices and oil, shake everything to the bottom and seal.

In the same pot as the eggs add your packet at the last  hour of cooking. Make sure it's submerged, I use magnets. 

When time's up remove and set aside while you fuss with the eggs. 

Open and pour into a fine sieve over a bowl and press the remains to get all the oil. Throw out the remnants. 

The Mayo

Depending on how you are doing it, you might need to adjust the instructions. I will give them for a stick blender. 

In a small bowl put your pasteurized egg, the juice of 1/2 - 1 lime (it depends on the size, my lime was huge and I ended up making more mayo than I wanted, looking for about 1 Tbs, 2 Tbs if you want it more like an aioli), a little salt and mustard in the bowl. Add about 2 Tbs of oil and start blending. In a slow steady stream add the flavored oil until you are out. Those little bits at the bottom, add those too. Add avocado oil until it turns into mayo. You can tell because it's not foamy and it gets a little thicker. Just stop and check it, does it feel like mayo? Remember that your mayo will firm up in the fridge a bit.  Also homemade mayo is thinner than commercial mayo. It also has less calories.


Now make me a sandwich! And don't skimp on the mayo.


A New Adventure - Mexican Inspired Oxtail Soup

I want a place to put my adventures. In life I've eaten many kinds of ways, and now I do my own thing. It's largely gluten free, often paleo or close to it, homemade with no cheats. But if you bitch about my food I will throw down and make a gluten filled, covered in dairy meal. I just might make my own cheese. And yes, I would be making the bread.  


Apparently Photos Count As Content. I made this meal with a friend, and the plating could have been better but we'd been at it a long time and were tired. Yay tacos!


I don't want to share with you my life history or what I like to do in the summer. I will tell you about food and how to cook it, and share my knowledge about food with you. I might talk about places to shop and things that pertain to food and my feelings about it. But I'm not telling you about my grandma or what I like to do on my perfect Sunday. I might tell you about food I've eaten. 

Apparently if you don't blather on for a while and talk about random ass shit browsers think that you have no 'content' and won't list you in the results, also how much time people spend on your site and blah, blah, blah. Also, everyone wants money for everything so all the sites are teeming with ads. Such bullshit. So, I have to have 'content'. 

I will give you a little story about my post I'll Bet Your Gluten Free Dumplings Suck. I took the recipe off. People were stealing my methods and then passing them off as their own (such is life and I'm not saying I haven't done it), I had an idea to start a business and needed to keep that a secret. It didn't happen (though I had much support from many fans, and several moms of rich children who can't eat anything but bark begging me to supply them with dumplings). I'm not giving you that recipe. I know what it is. I know how to do it, it's time consuming and a pain in the ass. Get the book Asian Dumplings by Nguyen and figure it out yourself. 

So.. Let's begin.


3 Day Mexican Inspired Oxtail Soup


I recently got a sous vide machine stick thingy mabobber. It's not the machine that holds water. It's a stick that you use a pot to make your own jerry rigged sous vide. You can buy these for a about $110-$200 online. I was very excited, the things I could cook slowly! I have been thinking 'what's the difference between this and a slow cooker?' Easily answered, slow cookers cook at one or two specific temperatures, and this can cook at any temperature I want it to. You want flavored oils? Easy (I now have like 5). You need pasteurized eggs? Done. Perfectly cooked meats, blah, blah, blah. 

I also came into possession of a pressure cooker. Between these two things, I've really upped my game. 

The one thing that apparently you can cook in your sous vide, that you might not think about is soup. I've been doing it, and it's really the way to go. Though, I've devised the slowest way to go about making soup known to man. But I'll bet my soup will blow your socks off. 

Let's get started. NOTE: There's several parts to this, you do what you want, you want to use unicorn blood instead of broth? Go ahead, but I don't want you posting comments that you changed the recipe and it didn't come out and this sucks, or that it did come out and was amazing. That's not my recipe and I don't give a rat's ass how your recipe went. I'll just delete it. 

This is a multi day recipe. It took me three days to make. 


Mexican Inspired Oxtail Soup

4-5 bowls

The Broth


Save your various veggie scraps in a gallon bag in the freezer until you have it full. Items might include:

Onion ends and skin (the skin has flavor)
Green onion ends
Carrot bits and peels
Celery bits and leaves
Pepper bits
Tomato ends
Herb stems (basil, cilantro, parsley, thyme)

Once your bag is full, pull out your pressure cooker and dump the contents in. You might add to it:

An onion
A broken up carrot
Garlic
Bay leaf

For this recipe I had processed a bunch of Hatch Chilis and saved the tops from about a pound or two of them and put those in. 

Add water (NO SALT)

Cook according to your pressure cooker's instructions. I cook mine for about 40 minutes. Strain. Put into ice cube trays and freeze and seal in freezer bags. You can also (if you are crafty about it) put it in your seal a meal and freeze flat bricks of broth. I make 2 C. bags and label them. You will need 4 C. of stock, frozen.


The Other Things


2 lbs Beef Oxtail (if you can go to the butcher and get the biggest pieces you can, about 3 of them, I don't want to digress, the little pieces = FLAVOR, but sous vide often has space constraints)
1 Onion diced
1 Carrot diced
1-2 Jalapenos (seeded, not seeded, whatever you want) diced
1 can diced tomato
2 bay leaves
1-3 tsp Mexican oregano
1-2 tsp ground cumin
2 tsp Avocado oil

SCROLL DOWN THERE'S MORE INGREDIENTS!

In a pan heat the oil and add the onion and carrot. Cook for about 5 minutes over medium heat. Remove from heat and set aside.

In a pan, add a little oil and heat over medium high heat. Brown the ox tail on each side until crispy looking and golden brown. This doesn't need to be perfect, we're just adding flavor. Set aside. Deglaze the pan with a little water. 

In a bag that is going to work with your sous vide machine and hold all the ingredients (I use my seal a meal, it works fine and better than ziplock bags for long periods of time), put 4C. frozen stock (it needs to be frozen so you can seal the bag), the deglazing, veggies (all of them), spices and ox tail into the bag. Add about 1 Tbs kosher salt, more or less as you please, but about a tablespoon will be enough. Check your ingredients to make sure you put them all in the bag. Did you check? You can't just go add those things your forgot, go check again. Seal up the bag making sure there is no air in the bag (you might find as it cooks that there's some, this is ok, it's soup). At this point you can put it in the fridge overnight if you need to. 

Heat your sous vide machine up to 155 degrees F. Set the timer for 24 hours. When it's up to temp add the bag and attach it to the side of the container. I use my metal stock pot and some very strong magnets for this. Wait.

When it's done take it out and put the whole bag in a pot, sealed, and then in the fridge overnight. This GREATLY improves the flavor. 

Open the bag and scoop out all the oil and fat, this should be easy as it should be mostly solid. Remove the tail and put the rest of the soup into a pot and put over medium heat. Test for salt. Remove the meat from the bones and discard the bones (I actually kept mine, I added them to my beef stock bag, I wonder if there's more life in them. We will see). Chop up the meat, don't worry that it's not grey, it's perfectly cooked. Wait until the soup is heated up to add the meat and just warm through, or you could divide it up among bowls and just ladle the hot soup over. 


The Accouterments 


2.25 C Drained and Rinsed Pinto beans (I make my own, they're better that way)
2 Tbs Garlic oil 
2.5 oz Queso Fresco
2-3 Radishes
2 Tbs minced Cilantro

Using a mandolin and care slice the radishes and then stack up and cut into little strips. Crumble the Queso. In a pan over medium/medium high heat - heat the oil (make sure it's a big pan, and more oil won't hurt here). Fry the beans until they are crispy and set aside. 

Ladle the soup into bowls and top carefully with 1/4 C beans, .5 oz Queso Fesco, several radish slices and cilantro. 

Enjoy!

Monday, January 7, 2013

Crabby Cakes

I have done a lot of discovering. Number one: Schar breads, they are the best. They're really, really good and they don't mold. Being held in a modified atmosphere, they aren't stale when you get them. I made bon mi with one, omg, I thought I had died and gone to GF heaven. This last holiday season my husband and I rented a cabin in the San Juans with our puppy dog and did some crabbing. Now, there are many types of crabs in the ocean but the best, by all amounts, are the dungeness crabs. Sweet and delicious, I don't know why you would do a whole lot more than just eat them. Boil a two pound crab for about 11 minutes and viola: perfection! We only caught one dungeness crab, and one little rock crab. Rock crab's not too bad, but he was barley legal and there wasn't much to him. I cooked him anyhow, mixed him with some semi-local shrimps (even though the imports looked better, buy local) and made crabish cakes. They were good!
This might sound like a no-brainier, but let me tell you what I endured. Warped old non-stick skillets, no spatulas, knives that are made from cardboard, and wearing a head lamp on my head to see what the hell I was cooking. Hardships, I know! I know! I don't travel without my own knives, and neither should you. Julia Child once said to bring your own good knives everywhere you go. I do draw the line at short social visits, but unless I am well acquainted with my friend's knives, I bring my own. During our several days, in this sorely under furnished kitchen, I cooked up some epic food. I cooked a pot roast WITHOUT A PAN, and also cooked crab cakes, pancakes, goose hash (wonderful), cream o' rice, and some other things that were tasty. I got some great kale from the cutest farm stand ever, and some fresh farm eggs. We even picked up some local lamb and and will be eating it shortly.
Anyhow, when making a gluten free crab cake, you must have patience. GF breads take time to soak up liquid. Choose a good crumb, one you make yourself is good, but I have trouble with my bread molding before I can make crumbs. The Schar crumbs are really quite good, if expensive. You must make soft cakes, not overwork you crab and be gentle with them while cooking. You MUST cook them in butter. If you have a milk allergy, well sucks to be you. Your crab cakes will just taste nasty, don't do that nasty stuff to delicious crab. Also, don't make them too dry, some people make them like bread cakes, but really the inside of a crab cake should be almost ... custardy, but not really. I don't measure anything, ever really, so you have to take these measurements with a grain of salt, and use your best judgement when making your cakes. These are a ... guideline.
Gluten Free Crab Cakes Ingredients: 2 Cups crab meat 1/3 Cup minced celery 1/3 Cup minced onion 1/3 - 1/2 Cup GF fine bread crumbs 1 egg 1/3 Cup mayonnaise (homemade is best) salt pepper cayenne pepper (you CANNOT leave that out) Butter More crumbs Method: Mix everything but the butter, extra crumbs and crab in a bowl, whisk well. Make sure it's not too wet or too dry, you should be able to make cakes from it. Fold in the crab. Heat your butter in a large flat heavy bottom pan. Medium heat, medium high, don't let it brown too much. Pull out a golf ball and a half sized lump of mixture and pat it a bit to make it round, place in the extra crumbs and the into the hot pan. I like to pat extra crumbs on the top of mine rather than flipping it. Sprinkle, pat, and this can be done in the pan. Wait two minutes, less? Until the bottom is done and golden brown. Carefully flip, and cook. Remove with care. Add more butter, repeat till you run out of crab. Eat. Repeat.

Tuesday, July 17, 2012

Gluten free bread and Expandex, a whole new ball of wax,

I continue to sing the praises of Expandex, it's the best stuff ever. I know I have complained about GF bread a number of times. Frankly, it's horrible for the most part. A lot of it tastes like cardboard and for the caloric load you'd probably get a better sandwich if you cut up a cereal box and put mayo on it.

I have tried every brand out there. The real issue is that GF bread dries out really fast and is only good for a day or two, three if you're going to make French toast or grilled cheese, or perhaps a Reuben. The best brand I have found, might not be the best brand for you, because it's local and it usually can be bought fresh, or at least not frozen. Freezing bread doesn't help it stay moist, it only puts off the mold a bit.

My biggest gripe honestly is the price I have to pay for a loaf of bread. They are small, they are stale and they are EXPENSIVE. $7+ a loaf $10+ from a bakery, and really what are you going to do? Have you seen the online pictures of homemade GF bread. Barf-o-rama. Small shrunken dense loafs of grit. Blah.

I haven't been making a lot of bread lately, even though I have discovered Expandex, because the sandwich rounds were working out fine. Today I made a loaf of bread. I turned it out, let it cool and then made a sandwich. Grilled cheese is back. I think it's the best GF bread I've had so far, and it's not like I've been sitting around not looking. I don't know how it will stand the test of time, I assume it will be fine tomorrow and a little stale on day three or four.

Previously, I claimed that you don't need a whole lot of Expandex, and that's true, but the more you use, the better your results. I guess it really has to do with what you're trying to do. I think that the more volume and puffyness you want the more expandex you need. I made cupcakes and took them to an event where people were munching away, commenting on how good they were. It came out that I use an all natural maple extract to make the cupcakes and they were like where do you get that? I told them where, and the website is a specialty flour company that I like a lot. Then one girl was like "so you use King Arthur flour" and I had to tell her that no, my cupcakes are gluten free. I don't normally say anything because if I do say something everyone gets their panties in a bunch and starts to think they're not any good, EVEN THOUGH they were just munching and commenting on the AMAZING cupcakes I made, thirty seconds ago. It's in your head. Gluten is the enemy of cake. Cake flour is so low in gluten that it's virtually gluten free. Good cake flour is 5-7% protein (gluten is protein), and in comparison bread flour is about 13%, just to put that in perspective for you. To help a little more a cup of wheat flour has about 13 grams of protein in it, and cup of rice flour has about 9 grams. It's not that there's a big protein difference, it's kind of about the type, and when you make cake, less is more. You also know, I'm sure of the care you have to take when making a cake not to over mix it, as you create gluten when you stir your batter and glutenous batter = rubbery cake.

I've gotten off onto a tangent, the point is that cakes and cookies and things like that are so easy to make GF it's silly so tell people as they will eat your baked goods and not know that they are wheatless. Wait, unless you go putting horrible things in them. I mean, sorghum, soy flour, brown rice (wtf, when did cookies need to be healthy?), some people put garbanzo bean flour in THEIR COOKIES! No,no, no, bad cook! You will use only white, ultra fine rice powder. No potato starch, just a little Expandex, tapioca starch, only use butter flavored Crisco, you can figure it out if you do that.

Bread is another ball of wax, it's not the same at all. Bread needs gluten and quite a lot of it. Expandex has leveled the playing field a bit. As you know I use a gluten substitute that you can purchase in stores and online, and if you haven't yet, you should because it's better than using gums because it has other things that commercial bakers are using and that make their breads a little better.

Before we begin, lets talk about bread pans. A lot of people like pan de mie pans. They are usually really long though, and that means they won't work as well. You need a smallish, tall sided pan. I have one specific for gluten free bread. Now, I'm not all into having a special pan for this, and a specific tool for that, but as I continue to bake more and more gluten free things I find that specialty pans work much better. So I have the special bread pan for baking gluten free loaves (thanks Mom!), I have a special pan for French bread, I have special cake pans and I'm thinking of getting a muffin top pan or a special pan for hamburger buns, because you just need the special pans. The point is, stop whining, suck it up and purchase a good pan.

Expandex Gluten Free Bread

Ingredients:

1 C. Expandex
1 C. GF flour blend (make your own, or whatever)
1 C. Sorghum flour
1 tsp. baking soda
1 tsp. baking powder
1 Tbs instant yeast
3 Tbs powdered buttermilk
2 Tbs sugar
1 tsp. Kosher salt
2.5 oz Organ Gluten Free Gluten
1/3 C. Shortening
1 egg
1-2 C. warm water

Method:

In a stand mixer place all dry ingredients and turn on mixer to stir and add shortening. Let mix until it resembles cornmeal. Whip the egg and 1/2 C water together and add to the mixer. Slowly increase speed and add water to make a thick batter. The batter needs to be beat til very smooth and homogenous.

Grease up a bread pan. Put a quart of water (I use a quart jar) into the oven and turn it on for a couple minutes. Then turn off the oven and put your hand in it to make sure it's not too warm. Place the bread in the oven and let rise for about 30-40 minutes. When your bread is about doubled take the water out of the oven, LEAVE THE BREAD IN THE OVEN, and turn the oven on to 350 degrees and cook till it reaches an internal temperature of 200 degrees. It will take about an hour.

Cool on a rack or towel for about an hour, slice, butter, jam? maybe honey, serve.

Yes, I admit, I use a thermometer because the bread is so stupid expensive (yet still cheaper than purchasing it) to make and dries out if you over cook it at all.
If you need to turn the oven on a little while rising

Friday, June 1, 2012

Expandex Gluten Free World of Wonder - Pizza Dough and Sandwich Rounds

I feel like a mad scientist lately, muahaha! I have done it, it’s alive! Not really, but victory is mine, and I’m super excited about it.

As a GF girl, I’m always on the lookout for the most bread like bread, and better pizza crusts and better, better, better! I was looking at Chebe bread, because it’s available online in bulk, but as I looked at the ingredients, I was like: this is tapioca starch. It’s not three bucks a cup, what’s up with this stuff. People freaking love it. It makes pao de queijo a Brazilian cheese bread that’s made from manioc or tapioca (honestly, amazing, you should interwebs that and make that). It’s really easy to make, it’s like a pate a choux, but without the gluten. It works because tapioca, when heated, magically becomes like gluten and holds in air bubbles. I was looking at the contents of the box, because I have a real hard time paying for the mixes, when for the most part, I can make these things from scratch for a fraction of the cost. I really mean that. Cookies, cakes, “bread.” There – that’s the problem. “Bread.” At six or seven dollars for a tiny little loaf, and six or seven dollars for FOUR burger buns, I’m coming to the end of wanting to purchase GF products.


I had a really boring day at work, with lots of time on my hands, and discovered that one of the ingredients in the short list for Chebe bread is modified tapioca starch. Mmmm, what’s that, and it must be the ingredient that makes this stuff work cold. Everything else I know what it is and how it works: tapioca flour, baking soda, cream o’ tartar, salt and seasonings.

Well I dug my little nose into the interwebs and found a company that makes and sells modified tapioca starch. It’s not a GMO product. It’s tapioca starch that’s been partially digested so those magical properties of tapioca when it’s heated, shine through in cold applications. People online raved about it. The name is a little weird: ‘Expandex,’ and makes me think of expanding pants. UNDETERRED by the name I poked around and found that one of the two stores in Washington that sell this magical stuff was around the corner from my work (it was fate, was it not?) I went and purchased some right away, and the store I was in… it is a GF Mecca! I was astounded by the selection and the fact that the coffee bar has GF baked goods in it from Flying Apron bakery! Not my fav, but they have some good stuff, and still! One sht-nf-sfv-l with a muffin please.

My first baking attempt to recreate the Chebe bread, it wasn’t so hot. In fact, I would put that down on the failure list. I knew that the Expandex wasn’t a bust, I just didn’t make the bread I thought I would make. Back at my boring assignment the next day I had plenty of time to poke around on the interwebs some more and find out about this great stuff that I had purchased. Because the Expandex is expensive, you have to be discerning about when and how much to use. The Expandex website recipes say to use lots of Expandex, all the Expandex! 2+ C. per recipe! This stuff is about $6 a pound, so… I think not. Most people say that you can use between ¼ - ½ C. per recipe with great results.

I went and made pizza dough for some lady friends of mine that night. It was… a revelation. A revolution, a wonderment of pizza. I finally had pizza that was soft, it folded, it was the best GF pizza I have ever had. I wanted to cry it was so good, and easy to make. My girlfriends were all pleased with the crust, and thought it quite tasty! I have since then used the Expandex in many recipes, making buns, pizza, French bread (OMG, I cried a little when I ate it), cake and other items with better success than ever before for one reason: you can make a dough and not a batter. This simply means that you can shape and roll it, instead of spreading and smearing. I mean REALLY roll it out, and it acts like … dough! Not all cracky and stupid and super gentle, well you still have to take care, but it makes baking fun again. Not a horrible disappointing chore!

I have to admit, I wasn’t baking before the Expandex very much. I wasn’t, it wasn’t satisfying, and had been purchasing more and more GF bread products, because they were better than the ones I could make. But now I have access to these great products, the items I make at home, are as good, if not better than the ones that I can buy. I also have control over the calories and size of the items now. Watch out world, here comes me with my GF goodness!

I do some other essential actions that I do; like I don’t use a liquid oil. This is essential. You may not use a liquid oil in GF cooking, unless you’re making a cake, or other traditional batter type recipe. You must use a solid oil, shortening works just fine, some people like coconut oil, but I find it imparts a coconut flavor to my food, which isn’t always desirable. You might be able to use butter, but I don’t think it’s quite the same. But who’s to tell you not to use butter? Freak out if you want about my homogenized oils, but there's not a lot per serving and honestly, I want good bread. I'm at that point, f---- off, I want good bread.

The reason for the shortening is really to increase the amount of liquid in your bread. The shortening won’t add to the liquid until it’s heated during cooking, and lets you create a dough rather than a batter. Julia Child makes this distinction in an episode of The French Chef, where she is making a bread for sandwiches, that has quite a lot of butter in it. She explains that the butter will add moisture later, but you don’t factor it into the liquid part of the recipe because it won’t be liquid till later when the bread is cooking, so you add it after the liquid has been added to the bread. That aside, it’s the idea that you think of the solid fats as … later liquid, not liquid right now.

I also use Orgran Gluten Free Gluten substitute. It’s a great product and I highly recommend it. Buy lots of it, you’ll tear through it once you get your Expandex.
The best recipe I have for pizza dough, and it’s simply just wonderful, and comforting to know that I can have good pizza again, I modified my recipe from the Expandex website. It’s not good for you, it’s not a ‘health pizza’, but it’s tasty and will keep you from the scenario when you are weeping while everyone else has nice soft pizza crust and you have a piece of cardboard.

I’ll give you two recipes here, one for the pizza dough and one for the sandwich rolls. I used these rolls at a BBQ and everyone pretty much ate them instead of the wheat buns, I’m not sure they were aware that they were GF. One gal ate a couple of them with butter and black raspberry jam(OMG another blog, so good, I grew these things and they are to die for!), so I assume they’re tasty to the wheat eaters of the world. They have changed my lunches and breakfasts: sandwiches are back!

Gluten Free Pizza Crust
Makes 2 thin 10ish inch pizza crusts

Ingredients:

½ C. Expandex
½ C. Tapioca starch
½ C. Corn starch
2 Tbs. rice or sorghum (or other grain)
1/3 C. Orgran Gluten Free Gluten
1 Tbs. sugar
1 Tbs. Instant yeast
2 tsp. Salt
½ tsp. Baking soda
½ tsp. Baking powder
Seasonings if you like (pictured has Italian seasoning in it)

¼ C. Crisco shortening (or other shortening of your choice)

1 Egg
½ C. Warm Water

Corn meal

Method:

Mix together the dry ingredients, all the way through seasonings. Rub the shortening into the dry ingredients, or cut it in with a pastry cutter until the flours look like corn meal.

Mix the egg and ¼ cup water together and mix into the flours, then slowly add enough water (you might need more or less than the remaining ¼ cup) till you get a soft, but not sticky dough. Turn out on a well floured surface and knead (yes, you will be able to knead the dough) well. Several turns till the dough is nice and smooth. Divide in half. Using a well floured surface and plastic wrap to cover the dough, roll it out into two circles.

Place onto a pizza stone or a baking sheet that is dusted with corn meal (I have found the baking sheet seems to take less time, but the pizza stone still works well too.) Let rise for 40 minutes. Heat oven to 450 degrees and bake crusts for about 8 minutes. At this point you can cool and freeze them, or you can top them and bake them another 7-9 minutes.

Gluten Free Sandwich Rounds
Makes 9-11 items

Ingredients:

½ C. Expandex
½ C. Tapioca starch
½ C. Sorghum
¼ C. Millet
1.65 oz. Orgran Gluten free Gluten
½ tsp. Baking powder
½ tsp. Baking soda
2 tsp. salt
2 tsp. sugar
1 Tbs. Instant yeast

3 Tbs. Crisco Shortening

1 tsp. vinegar
1 egg
¾ - 1 Cup warm water

Flour for dusting

Method:

Combine all dry ingredients in a bowl. Rub in shortening until it looks like corn meal.

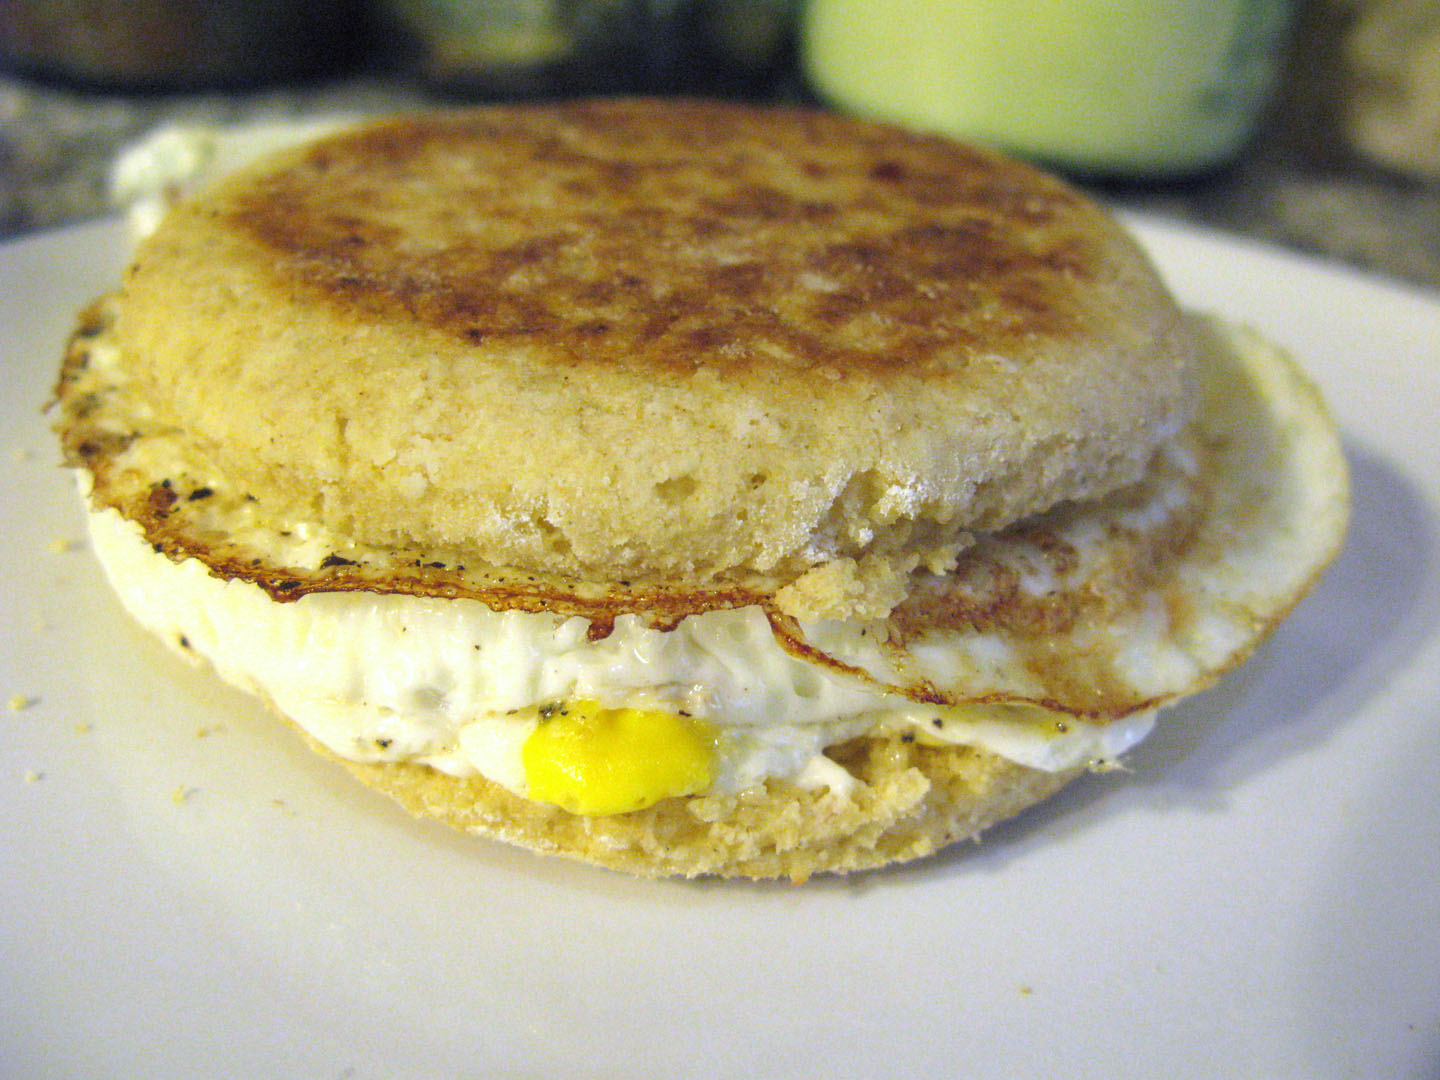
Whip egg, vinegar and ½ C. water in a small bowl and mix into dry. Add enough water to make a workable dough. Put dough on well-floured surface and knead well. Dust with flour and cover with saran wrap, roll out to about 1/3 inch thick. Use a 4 inch biscuit cutter and cut into rounds, thicker for burgers and thinner for daily use. Re-form into ball and roll out as needed. Alternately you can dry fry/lightly oil fry them on a griddle for a more English muffin type effect, and that is what is pictured in this blog. Both ways are great.

Let rise 45 minutes

Bake 350 for about 20 minutes. Move off of pan and cool on a clean towel or rack. Slice in half and serve. These will keep in a bag for about 3 days, pretty well.

Note: The ¾ cup grain flours can be all sorghum (very nutty flavor), or rice (for white bread) or other grain, but not all millet (crumbly).

Tuesday, April 10, 2012

Gluten Free Injera


I recently went out with a bunch of friends, for a birthday dinner at a Ethiopian restaurant (sorry, they don't have a website!) I've been there several times, but that was before I was wheat free. It's pretty good, the service is a little slow, but not rude, and the food is really, really tasty.

Injera (the bread) is traditionally wheat free, being made from teff flour. However, wheat is cheap and readily avaliable, so restaurants tend to supplement the teff with wheat, mostly for cost reasons, or so I thought. Now, some places will make GF injera for you, and I'm sure it's lovely, but they probably charge for it, because as we all know, GF flours are expensive.

I decided I would do it myself.

I bought an inexpensive, but well rated cookbook and did some research on the interwebs. When you look at the book, it's pretty short - about thirty pages long - so there aren't too many recipes in it. The reason you want this book is because it was written by American missionaries who didn't know how to cook Ethiopian food. See, that's the major complaint about most Ethiopian cookbooks: amounts and instructions tend to be very vague. Once you have a basic understanding of how to cook the food, look on the interwebs and find all the recipes you want, but because you now know how the basic cookery works, you won't feel like you're screwed. What these ladies did was move over there, get to know people and how to cook the food. Then they made a cookbook that we can understand!

It does not have a traditional injera recipe in it. It has ... a cheater recipe. I'm sure you've seen it out there, it used baking soda to leaven the bread. You're not going to get the right texture this way. Injera is a fermented bread and the fermentation process breaks down stuff in the grains.

So we come to my soap box moment: pretty much everyone on the interwebs says that injera is SUPER hard to make. It can't be. Honestly people a whole freaking country of people make this as a staple bread, it can't be rocket science. That's like saying pancakes are hard to make. What people don't understand out there is how to make sourdough bread. That's what it is, a sourdough bread. Get over yourselves, I did some research and managed it on try one. Crying out loud!

I also used my brain (perhaps I'm cheating by doing that), maybe something people out there didn't do. When you make GF breads, they tend to be crumbly. Crumble, crumble and then fall apart. Apparently this is a problem with GF injera, and this is where people think it's hard to make. I did not have this problem (see, using my brain here!) And this is probably why adding wheat is so popular, because it contains that magical substance: gluten. Gluten, the glue of breads that provides so much texture and reduces crumbles.

What do we all add to our flours to help fake that gluten feel? Xanthan gum.

Well, another point about Ethiopian food I have to make is they eat a lot fat. It seems to be where most of the calories come from. The books aren't wrong, it's not a typo, several recipes call for a cup or two of fat. These feed 4-6 people. Good gravy! If I ate like that I'd be super porky! Just add less. Like when you make anything healthy, just use less. I made one of the recipes that called for a cup of olive oil, and just used a few tablespoons, it turned out delicious. Don't worry about following the recipes that closely, just put in normal amounts of fat. Especially because they make a spiced butter, and you don't need a lot of that (1/4 cup here, 1/2 cup there, 2 cups to cook a pound of chicken), I think you'll get the hang of it when you start cooking it.

I will tell you what the pictures are: I have a lentil stew, a cabbage salad (I didn't photo it well because I had leftover red cabbage from another dinner I made with that great German red cabbage and it just didn't look at pretty when I got done with it all, but it tasted just fine. I wouldn't do it again for like, people coming over unless I knew them well. Instead I would use white cabbage.) There's a beef stew (amazing: saga) and a onion wot. You will notice that my injera folds, and folds nicely. I'm going to give you the recipe for the GF injera, because I couldn't really find a good one out there. I bought my teff from Whole Foods, but you can pick it up online if you don't have a good specialty store out there. I'm not sure that the grains you use will be super important, but I probably wouldn't use millet. I like it, but it's really crumbly, so I would maybe use quinoa or something like that if you don't have sorghum.

You must start the night before, it only takes a minute to whip up, and then you take care of it the next day. This will start out not very sour, but get better as you make it over a period of several days, and when you make Ethiopian food, it's like a leftover's dream. You'll be able to just whip up the bread and heat up leftovers for a week at a time if you cook a bunch at once, or just make one more dish as they start to run out.

Another small note, you don't eat a lot of each dish, just like 1/3 cup, so invite friends over.

Gluten Free Injera

Ingredients Day 1:

1/3 C. Teff flour
1/3 C. Sorghum flour
1/3 C. Basic rice mix or other GF blend (it probably won't matter)
1 tsp. yeast
1 tsp. xanthan gum
2 C. water


Ingredients Day 2:
1/3 C. Teff flour
1/3 C. Sorghum flour
1/3 C. Basic rice mix or other GF blend (it probably won't matter)
1 C. water
a little salt
some oil in your misto

Equipment:
A pan that you can make crepes in. I've often used my big cast iron pan for this, it is well seasoned and works really well. A crepe pan would work, but I've been using a big non-stick skillet that's in good condition.

Method:

Whisk together the day 1 dry ingredients and then whisk in the water. Cover loosely with a clean plastic bag and set on the counter to hang out. It might look a little gloopy, have no fear, just let it be, and it might also be a bit lumpy.

The next evening when you're ready to make the injera whisk up the batter and then take out 1/2 cup or so and put it in a clean bowl. Again add the ingredients for day one to this new bowl and whisk it all together. This is the last day I would add yeast, just two days of yeast, as you'll have a good sourdough started after that. If it doesn't rise up the third time, just pitch in a tsp of yeast in the morning.

Now with the rest of your batter whisk in the ingredients for day 2. Whisk them well and let it sit and whisk again to remove lumps. My stove is a gas stove that has 7 settings (1 is low and 7 is high). I put my stove on 3, a low setting. Heat your pan and give it a little tiny mist. Rub a clean cloth around to leave enough oil for crepes. Take the pan and hold it in your off hand, pour about 1/2 cup of batter in the center and shake and tilt the pan to move the batter to cover the pan. When you're done shaking, shake the excess toward the center of the pan to leave thin edges.

Put the pan on the heat and let it hang out till the edges start to pull away from the pan. It might not look all done, but should be dry and have lots of broken bubbles. Lots of people talk about how you need a cover to finish the cooking, I just flip mine over for a few seconds, just to finish those pesky little spots that aren't done.

Remove from the pan (do be gentle) and place on a cloth, stack them up they don't seem to stick too much.

Repeat until you're out of batter.

This process can keep going as long as your batter is good. It will get more sour over time, and if you get to a point where you're not going to make it for a while, just save some of the batter in the fridge (in a very clean jar), probably not for more than a month. But you can feed it like sourdough to keep it going longer. The first day, of course you won't have very sour bread, but it was still good. The bread will just get better with time.

Monday, February 20, 2012

I'll bet your gluten free dumplings suck.

I looked all over the web for GF dumpling wrappers. Most people call them wonton wrappers, but I know that you can make all sorts of delightful dumplings out of them. Also I'm not looking for wonton wrappers specifically, I want the Korean-slightly chewy style that just scream home-made dumplings when you bite into them.

If you google gluten free wonton, you get some very lame discussions about how you have to make them yourself (duh), or that you can buy the tapioca ones usually used for fresh rolls, but also a lot of recipes that are the same. They all call for about a cup of flour, an egg and some xanthum gum. You make this into a stiff pasta type dough and roll it out thin. I tried this, and it's ... ok. I mean, you can make wonton skins like this and they're not bad, but really they're not that good. If you're looking for something really good, that reminds you of the dumplings of your childhood, this won't cut it.

I also noticed that they couldn't be rolled very thin and the dough kept trying to break apart and crumbled a little. It's not the best way honestly.

I would recommend this last method for people who want to fry their wontons, as it will probably work pretty good, but I like to cook mine like gyoza, fry them a bit and then steam them. I also like to put them in soup, and this means your dumpling skin has to be a bit heartier. Not thicker, but able to hold up. I'm sure you all know that gluten free items are not know for their ability to 'hold up'. Breads are crumbly, buns don't work as well as they could, let's not talk about tortillas. Though I do have a new idea for my tortillas, I was looking at the commercially made ones and they put xanthan gum in theirs. I'm going to give it a try.

Back in my wheat eating days I made dumplings all the time. I liked making them and found the project a good one for my couch and the tv with a big cutting board and my pasta roller. I made them in all flavors and cooked them different ways. I liked steaming them, frying them and dropping them into broth to make a quick soup. I also liked making bao but I will have to work on that later.

This new way to make GF dumplings I came up with from my experience and lots of Asian and Korean cookbooks. They are not GF cook books, but that doesn't make them without value.

Now, this might seem super messy when you start out, but you must persevere. You must also follow the directions and use the products listed.

I use a basic flour mix: two parts rice flour, one third part tapioca flour, two thirds part potato starch. I make this and keep it in my flour container on my counter. I add in whole meal flours, quinoa, KA Ancient grains blend, millett, whatever I need and go from there.

This next bit of information is important. I don't muck around with gritty flour. I don't like grit, and I don't like bean flavor. I buy rice powder, it's easy to get from Asian grocery stores, sold as rice flour, it's extremely fine. Don't give me your whole grain BS, I don't want to hear it. I don't get to eat wheat and I want good products. This is how you make them. Brown rice flour has bad texture. Bad. Do not use it, your dumplings will suck, and so will most of the things you make out of.

I also have a product I use for more glutenous flour applications. OrgraN Gluten Free Gluten Substitute. It's really good, and it's available from a major online distributor. You know the one. They sell lots of things. Don't worry that you have to buy so much, you'll use it once you figure out how make bread with it. It's great.

Now that you have these things you will need other things: a pasta roller, you might be able to use a tortilla press, but I don't think it would be the same. You will also need a lot of a starch. I use potato starch because I get it automatically delivered and isn't very expensive that way. Tapioca or corn starch will also work.

You can fill your dumplings with whatever you like. I used beef because that's what I have on hand. I also like to make non-Asian style ones, you could use these skins to make perogies and other recipes that call for wonton skins, like little pies or what have you. I have a basic recipe for a beef filling, but really any meat would work.

Now that we have discussed the things needed here is how to make the best gluten free dumplings there are.