Showing posts with label wheat free. Show all posts

Sunday, August 27, 2017

My Mayo Will Make Your Mayo Sad. With Sadness.

I've had problems with mayonnaise. For years I did just what Julia Child told me and no problems. Then I moved and because of stuff I didn't have space for my blender. Now I can't follow JC's instructions. I know there are many ways to make mayo, and I have been told that the food processor works just fine. I beg to differ. I tried making an herbed mayo sauce and it split and I added an egg and tried again and it still split and I just threw it out. 

Things that make mayo:

Whisks
Blenders
Stick Blenders

I'm now using my stick blender, it works great, just use a small bowl. 

I was talking with some chefy type people and they were saying they have trouble getting their mayo not to split and I asked if they were measuring their oil. They were. This is fine, if you also measure your egg yolk. Eggs are not exactly the same and they vary from chicken to chicken and egg to egg. This means that you can't say two yolks to a cup of oil and have mayo come out. I actually have no idea what the ratio is supposed to be, I do it like JC said to, I add oil until it's done. So, if you want to measure, look up the amount of yolk you should have to oil, come on, it's the future, and you can go dance in the field. 

Today, I decided to pasteurize some eggs, as my theory is that the mayo will be good for longer. Sous vide, not hard, you poach them at like 135 or so for about 2 hours. While this was going on, I decided that I would make an infused oil. Infused oils cook for about an hour around 120-130 so I figured this was fine. 

Real quick, let's talk food safety. It's not something to sniff at. Listen up. Raw eggs can be dangerous to some people. And that information is private to those people (age, medical conditions, ect.), so you don't know who they are. I mean you might, if you look at that 2 year old and then offer him a deviled egg you made with your own mayo and then think, huh. If you plan to serve your homemade egg based salad dressing or mayo, pasteurize your eggs. Also, when you make oil infusions there is the chance that you can get botulism from them. You know the stories for people who died from eating the beans? That's not messing around. So, minimize risk. Wash your herbs and dry them (you know, oil doesn't get along with water), garlic needs to be used with caution and the result not kept around for long periods of time, or frozen; keep in the fridge. That being said I've made non sous vide oils with low heat before from fresh herbs and had no problems. I'm not having problems now. I don't want to scare you, I want you to be cautious. I blanch my garlic before use, and you should too, also it makes it easy to peel. 

Between these two things I have made a topping for my various foods (I like a Mexi egg omelette in the morning and this will keep me from wishing I had sour cream).

So let's get to it. 
You can tell he's pasteurized because he's marked. 

Sous Vide Pasteurized Eggs


Follow your sous vide instructions and heat the thing up to 135 and set the timer for 2 hours. Add the eggs in the shell. I put mine in a little bag with some water around them and attached them to the edge of the pot to make them easy to pull out. Remove, ice bath, mark. 


The Most Mexican Spiced Mayo


3 cloves garlic, crushed
1 jalapeno, diced
1/3 bunch cilantro chopped (stems too)
3 tsp Mexican oregano
2 tsp Ground cumin (I didn't have it but whole cumin is better just toast it in a pan first)
About 1/3-1/2 cup avocado oil

Avocado oil
1 lime
1 tsp the plainest mustard you can get
salt
1 pasteurized egg

Put the garlic, jalapeno, cilantro, oregano and cumin in a bag suited for sous viding. I use seal a meal for these as you don't want ANY air in the bag. Add the spices and oil, shake everything to the bottom and seal.

In the same pot as the eggs add your packet at the last  hour of cooking. Make sure it's submerged, I use magnets. 

When time's up remove and set aside while you fuss with the eggs. 

Open and pour into a fine sieve over a bowl and press the remains to get all the oil. Throw out the remnants. 

The Mayo

Depending on how you are doing it, you might need to adjust the instructions. I will give them for a stick blender. 

In a small bowl put your pasteurized egg, the juice of 1/2 - 1 lime (it depends on the size, my lime was huge and I ended up making more mayo than I wanted, looking for about 1 Tbs, 2 Tbs if you want it more like an aioli), a little salt and mustard in the bowl. Add about 2 Tbs of oil and start blending. In a slow steady stream add the flavored oil until you are out. Those little bits at the bottom, add those too. Add avocado oil until it turns into mayo. You can tell because it's not foamy and it gets a little thicker. Just stop and check it, does it feel like mayo? Remember that your mayo will firm up in the fridge a bit.  Also homemade mayo is thinner than commercial mayo. It also has less calories.


Now make me a sandwich! And don't skimp on the mayo.


A New Adventure - Mexican Inspired Oxtail Soup

I want a place to put my adventures. In life I've eaten many kinds of ways, and now I do my own thing. It's largely gluten free, often paleo or close to it, homemade with no cheats. But if you bitch about my food I will throw down and make a gluten filled, covered in dairy meal. I just might make my own cheese. And yes, I would be making the bread.  


Apparently Photos Count As Content. I made this meal with a friend, and the plating could have been better but we'd been at it a long time and were tired. Yay tacos!


I don't want to share with you my life history or what I like to do in the summer. I will tell you about food and how to cook it, and share my knowledge about food with you. I might talk about places to shop and things that pertain to food and my feelings about it. But I'm not telling you about my grandma or what I like to do on my perfect Sunday. I might tell you about food I've eaten. 

Apparently if you don't blather on for a while and talk about random ass shit browsers think that you have no 'content' and won't list you in the results, also how much time people spend on your site and blah, blah, blah. Also, everyone wants money for everything so all the sites are teeming with ads. Such bullshit. So, I have to have 'content'. 

I will give you a little story about my post I'll Bet Your Gluten Free Dumplings Suck. I took the recipe off. People were stealing my methods and then passing them off as their own (such is life and I'm not saying I haven't done it), I had an idea to start a business and needed to keep that a secret. It didn't happen (though I had much support from many fans, and several moms of rich children who can't eat anything but bark begging me to supply them with dumplings). I'm not giving you that recipe. I know what it is. I know how to do it, it's time consuming and a pain in the ass. Get the book Asian Dumplings by Nguyen and figure it out yourself. 

So.. Let's begin.


3 Day Mexican Inspired Oxtail Soup


I recently got a sous vide machine stick thingy mabobber. It's not the machine that holds water. It's a stick that you use a pot to make your own jerry rigged sous vide. You can buy these for a about $110-$200 online. I was very excited, the things I could cook slowly! I have been thinking 'what's the difference between this and a slow cooker?' Easily answered, slow cookers cook at one or two specific temperatures, and this can cook at any temperature I want it to. You want flavored oils? Easy (I now have like 5). You need pasteurized eggs? Done. Perfectly cooked meats, blah, blah, blah. 

I also came into possession of a pressure cooker. Between these two things, I've really upped my game. 

The one thing that apparently you can cook in your sous vide, that you might not think about is soup. I've been doing it, and it's really the way to go. Though, I've devised the slowest way to go about making soup known to man. But I'll bet my soup will blow your socks off. 

Let's get started. NOTE: There's several parts to this, you do what you want, you want to use unicorn blood instead of broth? Go ahead, but I don't want you posting comments that you changed the recipe and it didn't come out and this sucks, or that it did come out and was amazing. That's not my recipe and I don't give a rat's ass how your recipe went. I'll just delete it. 

This is a multi day recipe. It took me three days to make. 


Mexican Inspired Oxtail Soup

4-5 bowls

The Broth


Save your various veggie scraps in a gallon bag in the freezer until you have it full. Items might include:

Onion ends and skin (the skin has flavor)
Green onion ends
Carrot bits and peels
Celery bits and leaves
Pepper bits
Tomato ends
Herb stems (basil, cilantro, parsley, thyme)

Once your bag is full, pull out your pressure cooker and dump the contents in. You might add to it:

An onion
A broken up carrot
Garlic
Bay leaf

For this recipe I had processed a bunch of Hatch Chilis and saved the tops from about a pound or two of them and put those in. 

Add water (NO SALT)

Cook according to your pressure cooker's instructions. I cook mine for about 40 minutes. Strain. Put into ice cube trays and freeze and seal in freezer bags. You can also (if you are crafty about it) put it in your seal a meal and freeze flat bricks of broth. I make 2 C. bags and label them. You will need 4 C. of stock, frozen.


The Other Things


2 lbs Beef Oxtail (if you can go to the butcher and get the biggest pieces you can, about 3 of them, I don't want to digress, the little pieces = FLAVOR, but sous vide often has space constraints)
1 Onion diced
1 Carrot diced
1-2 Jalapenos (seeded, not seeded, whatever you want) diced
1 can diced tomato
2 bay leaves
1-3 tsp Mexican oregano
1-2 tsp ground cumin
2 tsp Avocado oil

SCROLL DOWN THERE'S MORE INGREDIENTS!

In a pan heat the oil and add the onion and carrot. Cook for about 5 minutes over medium heat. Remove from heat and set aside.

In a pan, add a little oil and heat over medium high heat. Brown the ox tail on each side until crispy looking and golden brown. This doesn't need to be perfect, we're just adding flavor. Set aside. Deglaze the pan with a little water. 

In a bag that is going to work with your sous vide machine and hold all the ingredients (I use my seal a meal, it works fine and better than ziplock bags for long periods of time), put 4C. frozen stock (it needs to be frozen so you can seal the bag), the deglazing, veggies (all of them), spices and ox tail into the bag. Add about 1 Tbs kosher salt, more or less as you please, but about a tablespoon will be enough. Check your ingredients to make sure you put them all in the bag. Did you check? You can't just go add those things your forgot, go check again. Seal up the bag making sure there is no air in the bag (you might find as it cooks that there's some, this is ok, it's soup). At this point you can put it in the fridge overnight if you need to. 

Heat your sous vide machine up to 155 degrees F. Set the timer for 24 hours. When it's up to temp add the bag and attach it to the side of the container. I use my metal stock pot and some very strong magnets for this. Wait.

When it's done take it out and put the whole bag in a pot, sealed, and then in the fridge overnight. This GREATLY improves the flavor. 

Open the bag and scoop out all the oil and fat, this should be easy as it should be mostly solid. Remove the tail and put the rest of the soup into a pot and put over medium heat. Test for salt. Remove the meat from the bones and discard the bones (I actually kept mine, I added them to my beef stock bag, I wonder if there's more life in them. We will see). Chop up the meat, don't worry that it's not grey, it's perfectly cooked. Wait until the soup is heated up to add the meat and just warm through, or you could divide it up among bowls and just ladle the hot soup over. 


The Accouterments 


2.25 C Drained and Rinsed Pinto beans (I make my own, they're better that way)
2 Tbs Garlic oil 
2.5 oz Queso Fresco
2-3 Radishes
2 Tbs minced Cilantro

Using a mandolin and care slice the radishes and then stack up and cut into little strips. Crumble the Queso. In a pan over medium/medium high heat - heat the oil (make sure it's a big pan, and more oil won't hurt here). Fry the beans until they are crispy and set aside. 

Ladle the soup into bowls and top carefully with 1/4 C beans, .5 oz Queso Fesco, several radish slices and cilantro. 

Enjoy!

Friday, June 1, 2012

Expandex Gluten Free World of Wonder - Pizza Dough and Sandwich Rounds

I feel like a mad scientist lately, muahaha! I have done it, it’s alive! Not really, but victory is mine, and I’m super excited about it.

As a GF girl, I’m always on the lookout for the most bread like bread, and better pizza crusts and better, better, better! I was looking at Chebe bread, because it’s available online in bulk, but as I looked at the ingredients, I was like: this is tapioca starch. It’s not three bucks a cup, what’s up with this stuff. People freaking love it. It makes pao de queijo a Brazilian cheese bread that’s made from manioc or tapioca (honestly, amazing, you should interwebs that and make that). It’s really easy to make, it’s like a pate a choux, but without the gluten. It works because tapioca, when heated, magically becomes like gluten and holds in air bubbles. I was looking at the contents of the box, because I have a real hard time paying for the mixes, when for the most part, I can make these things from scratch for a fraction of the cost. I really mean that. Cookies, cakes, “bread.” There – that’s the problem. “Bread.” At six or seven dollars for a tiny little loaf, and six or seven dollars for FOUR burger buns, I’m coming to the end of wanting to purchase GF products.


I had a really boring day at work, with lots of time on my hands, and discovered that one of the ingredients in the short list for Chebe bread is modified tapioca starch. Mmmm, what’s that, and it must be the ingredient that makes this stuff work cold. Everything else I know what it is and how it works: tapioca flour, baking soda, cream o’ tartar, salt and seasonings.

Well I dug my little nose into the interwebs and found a company that makes and sells modified tapioca starch. It’s not a GMO product. It’s tapioca starch that’s been partially digested so those magical properties of tapioca when it’s heated, shine through in cold applications. People online raved about it. The name is a little weird: ‘Expandex,’ and makes me think of expanding pants. UNDETERRED by the name I poked around and found that one of the two stores in Washington that sell this magical stuff was around the corner from my work (it was fate, was it not?) I went and purchased some right away, and the store I was in… it is a GF Mecca! I was astounded by the selection and the fact that the coffee bar has GF baked goods in it from Flying Apron bakery! Not my fav, but they have some good stuff, and still! One sht-nf-sfv-l with a muffin please.

My first baking attempt to recreate the Chebe bread, it wasn’t so hot. In fact, I would put that down on the failure list. I knew that the Expandex wasn’t a bust, I just didn’t make the bread I thought I would make. Back at my boring assignment the next day I had plenty of time to poke around on the interwebs some more and find out about this great stuff that I had purchased. Because the Expandex is expensive, you have to be discerning about when and how much to use. The Expandex website recipes say to use lots of Expandex, all the Expandex! 2+ C. per recipe! This stuff is about $6 a pound, so… I think not. Most people say that you can use between ¼ - ½ C. per recipe with great results.

I went and made pizza dough for some lady friends of mine that night. It was… a revelation. A revolution, a wonderment of pizza. I finally had pizza that was soft, it folded, it was the best GF pizza I have ever had. I wanted to cry it was so good, and easy to make. My girlfriends were all pleased with the crust, and thought it quite tasty! I have since then used the Expandex in many recipes, making buns, pizza, French bread (OMG, I cried a little when I ate it), cake and other items with better success than ever before for one reason: you can make a dough and not a batter. This simply means that you can shape and roll it, instead of spreading and smearing. I mean REALLY roll it out, and it acts like … dough! Not all cracky and stupid and super gentle, well you still have to take care, but it makes baking fun again. Not a horrible disappointing chore!

I have to admit, I wasn’t baking before the Expandex very much. I wasn’t, it wasn’t satisfying, and had been purchasing more and more GF bread products, because they were better than the ones I could make. But now I have access to these great products, the items I make at home, are as good, if not better than the ones that I can buy. I also have control over the calories and size of the items now. Watch out world, here comes me with my GF goodness!

I do some other essential actions that I do; like I don’t use a liquid oil. This is essential. You may not use a liquid oil in GF cooking, unless you’re making a cake, or other traditional batter type recipe. You must use a solid oil, shortening works just fine, some people like coconut oil, but I find it imparts a coconut flavor to my food, which isn’t always desirable. You might be able to use butter, but I don’t think it’s quite the same. But who’s to tell you not to use butter? Freak out if you want about my homogenized oils, but there's not a lot per serving and honestly, I want good bread. I'm at that point, f---- off, I want good bread.

The reason for the shortening is really to increase the amount of liquid in your bread. The shortening won’t add to the liquid until it’s heated during cooking, and lets you create a dough rather than a batter. Julia Child makes this distinction in an episode of The French Chef, where she is making a bread for sandwiches, that has quite a lot of butter in it. She explains that the butter will add moisture later, but you don’t factor it into the liquid part of the recipe because it won’t be liquid till later when the bread is cooking, so you add it after the liquid has been added to the bread. That aside, it’s the idea that you think of the solid fats as … later liquid, not liquid right now.

I also use Orgran Gluten Free Gluten substitute. It’s a great product and I highly recommend it. Buy lots of it, you’ll tear through it once you get your Expandex.
The best recipe I have for pizza dough, and it’s simply just wonderful, and comforting to know that I can have good pizza again, I modified my recipe from the Expandex website. It’s not good for you, it’s not a ‘health pizza’, but it’s tasty and will keep you from the scenario when you are weeping while everyone else has nice soft pizza crust and you have a piece of cardboard.

I’ll give you two recipes here, one for the pizza dough and one for the sandwich rolls. I used these rolls at a BBQ and everyone pretty much ate them instead of the wheat buns, I’m not sure they were aware that they were GF. One gal ate a couple of them with butter and black raspberry jam(OMG another blog, so good, I grew these things and they are to die for!), so I assume they’re tasty to the wheat eaters of the world. They have changed my lunches and breakfasts: sandwiches are back!

Gluten Free Pizza Crust
Makes 2 thin 10ish inch pizza crusts

Ingredients:

½ C. Expandex
½ C. Tapioca starch
½ C. Corn starch
2 Tbs. rice or sorghum (or other grain)
1/3 C. Orgran Gluten Free Gluten
1 Tbs. sugar
1 Tbs. Instant yeast
2 tsp. Salt
½ tsp. Baking soda
½ tsp. Baking powder
Seasonings if you like (pictured has Italian seasoning in it)

¼ C. Crisco shortening (or other shortening of your choice)

1 Egg
½ C. Warm Water

Corn meal

Method:

Mix together the dry ingredients, all the way through seasonings. Rub the shortening into the dry ingredients, or cut it in with a pastry cutter until the flours look like corn meal.

Mix the egg and ¼ cup water together and mix into the flours, then slowly add enough water (you might need more or less than the remaining ¼ cup) till you get a soft, but not sticky dough. Turn out on a well floured surface and knead (yes, you will be able to knead the dough) well. Several turns till the dough is nice and smooth. Divide in half. Using a well floured surface and plastic wrap to cover the dough, roll it out into two circles.

Place onto a pizza stone or a baking sheet that is dusted with corn meal (I have found the baking sheet seems to take less time, but the pizza stone still works well too.) Let rise for 40 minutes. Heat oven to 450 degrees and bake crusts for about 8 minutes. At this point you can cool and freeze them, or you can top them and bake them another 7-9 minutes.

Gluten Free Sandwich Rounds
Makes 9-11 items

Ingredients:

½ C. Expandex
½ C. Tapioca starch
½ C. Sorghum
¼ C. Millet
1.65 oz. Orgran Gluten free Gluten
½ tsp. Baking powder
½ tsp. Baking soda
2 tsp. salt
2 tsp. sugar
1 Tbs. Instant yeast

3 Tbs. Crisco Shortening

1 tsp. vinegar
1 egg
¾ - 1 Cup warm water

Flour for dusting

Method:

Combine all dry ingredients in a bowl. Rub in shortening until it looks like corn meal.

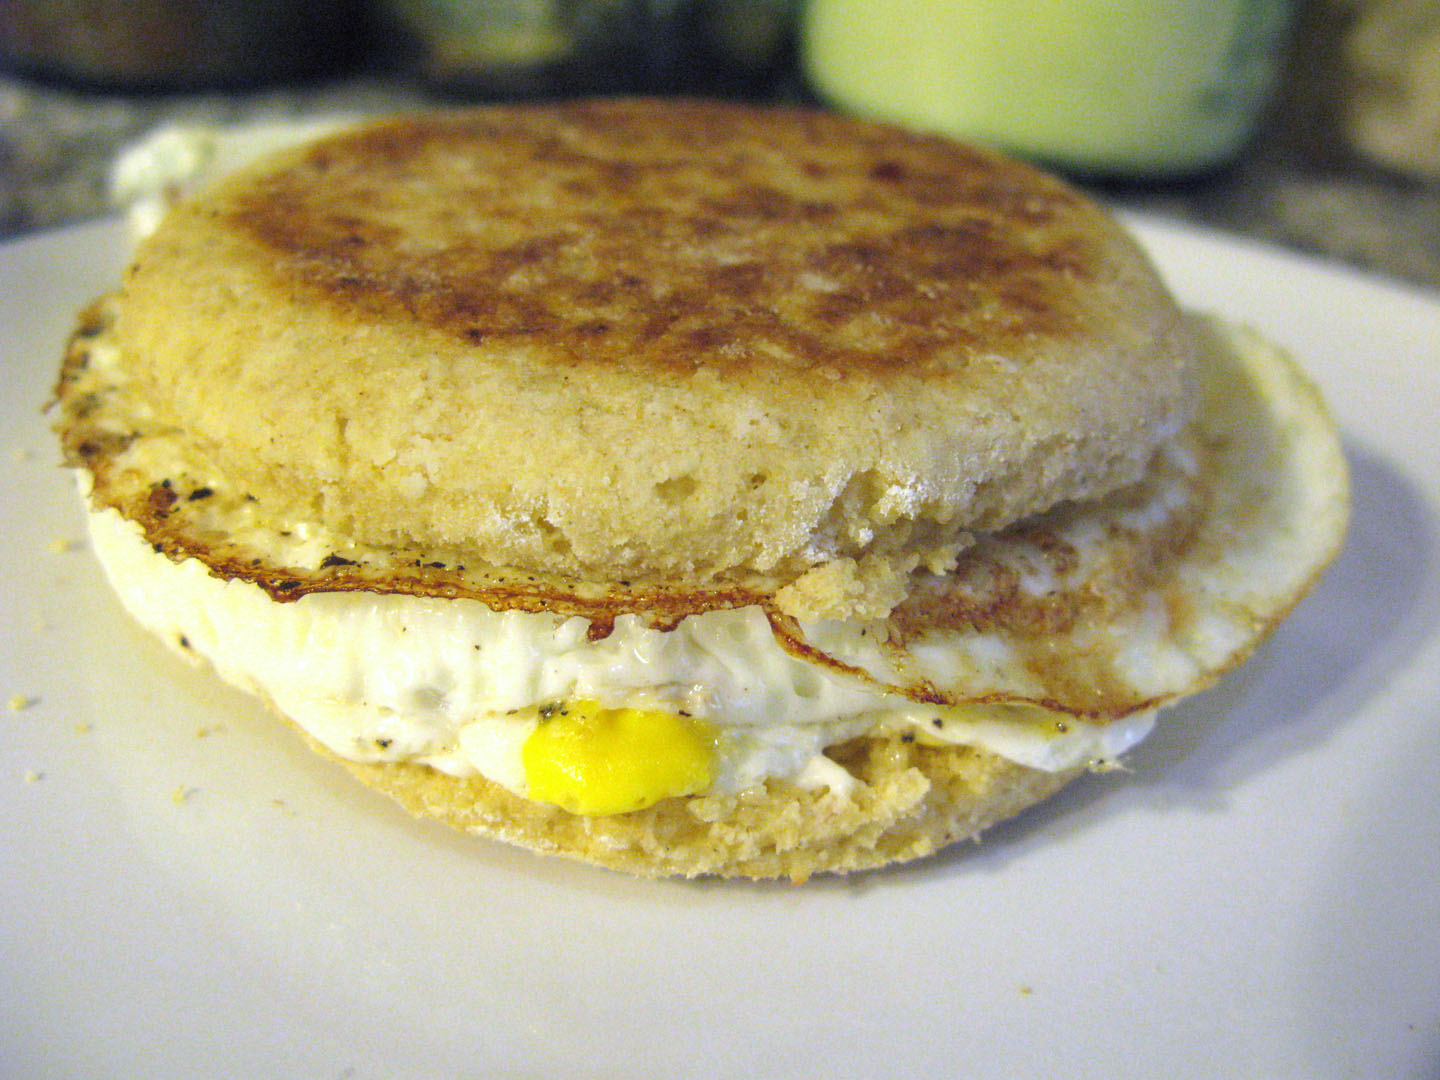
Whip egg, vinegar and ½ C. water in a small bowl and mix into dry. Add enough water to make a workable dough. Put dough on well-floured surface and knead well. Dust with flour and cover with saran wrap, roll out to about 1/3 inch thick. Use a 4 inch biscuit cutter and cut into rounds, thicker for burgers and thinner for daily use. Re-form into ball and roll out as needed. Alternately you can dry fry/lightly oil fry them on a griddle for a more English muffin type effect, and that is what is pictured in this blog. Both ways are great.

Let rise 45 minutes

Bake 350 for about 20 minutes. Move off of pan and cool on a clean towel or rack. Slice in half and serve. These will keep in a bag for about 3 days, pretty well.

Note: The ¾ cup grain flours can be all sorghum (very nutty flavor), or rice (for white bread) or other grain, but not all millet (crumbly).

Friday, November 4, 2011

Even better than before!


I just made a new batch of my GF pumpkin muffins, and they are so good I realized I had done a disservice to you all by posting my previous recipe. I'm so amazed at the goodness created by the new flours I'm incorporating it's really hard to believe that I waited so long to expand my horizons.

When I started out GF it was very intimidating. There are so many flours out there that the lists go on, and on. I decided I would only start with a few alternative flours and learn those first, and the nature of non-wheat flours. I used rice, tapioca, potato starch, and a little oat, I also tried a bean flour mix. I worked on the rice mixtures and tried all sorts ways to recreate the protein structure of gluten. I tried eggs, gelatin (btw, that does NOT work), xanthan gum, guar gum, no gums, lots of gums, medium amounts of gums, all the gums, and I have settled on two options. I have some guar gum in my pantry, I will use it if I need to. Now I use Gluten Free Gluten, and that works really well. I also have xanthan gum and use that quite a bit. The thing about the GFG is that it has some of the gums you would normally use in it, it also has a few that are only available to commercial bakers. Perfectly measured out, you use 1 part of the GFG to 5 parts whatever flour mixture you use. I don't use it in quick breads, it's only intended for yeast breads, where you would have a higher gluten content.

Having been baking a lot this last two months, attempting to recreate bread for a sandwich (not easy to do), I am starting to branch out. I pulled out my mill today and milled up some quinoa. I have some milled oat flour and some teff on the way. I did this mostly because rice flour has a lot of calories in it. 550 calories a cup? Wheat flour only has around 400 a cup. WW says rice flour has 15-17 points in a cup of rice flour, wheat flour has 12 points in it. It's a big difference when you're really counting calories.

Let's talk about GF bread for a minute. I'm sure it would make great stuffing, because it's all so dry! Many of them taste fine, but they tend to be small, already stale, and expensive. I bought a local commercial loaf, thinking it would be great, however the slices are so tiny and thin it makes me wonder how they're packing 80 calories into a slice! Also when I toast them they turn into hard chunks of mouth ripping cardboard.

Tomorrow I'm making french toast.

I did find a local gluten free bakery, and I've had some items from them that are really quite good. I liked them so much I bought a cookbook written by the owner. I then went and bought a loaf of bread from the bakery. The woman loves bean flour. Garbanzo bean flour in this, garbanzo bean flour in that, making cookies? Add garbanzo beans why not? Can you make your baked goods more dense? You want to know why the cakes are so heavy and a loaf of bread from this place weighs two pounds, yet is the size of a bloated softball? Garbanzo bean flour is super heavy, and doesn't rise very well. I'm not saying her bread is bad. It's quite good, but not really what I'm looking for. It is tasty, but I'm not sure it's the best for sandwiches unless you slice your slices 1/4 pound thick. I am not a fan of her cake. It has garbanzo bean flour in it. Cake SHOULD NOT BE DENSE! The densest cupcakes known to man.

It also makes me think: she says she focuses on whole grains, but mostly she just uses garbanzo bean flour. Where's the variety? I have noticed that once chefs find a method that works for them, they stick to it. In cookbooks, they tend to have one basic blend, and that's what they use for everything. It's usually a rice blend, augmented with teff, sorgum or garbanzo bean flours.

I'm not sure where I'm going, but I don't want to have a 'generic' mix, and would rather use the freshly ground grains I have from my recent millings, so they stay fresh and use what is available rather than a standard mix.

Where is all this going? I removed a cup of rice flour from my pumpkin muffins and added to it 1/2 C quinoa flour and 1/2 C oat flour. I also ground my own rice flour, it took some time and I had to put it through the mill a few times. I thought they might turn out too grainy or gritty, but no! The mill worked really well for the rice, it ground up very fine and very little remained after sifting. Quinoa also mills into a nice fine flour on the finest setting. I have a heavy duty professional grade KitchenAid stand mixer, so I'm able to use the mill attatchment with that. I don't think you should use a mill if you have a smaller stand mixer, just buy a quality free standing mill.

Every time I make baked goods, I must try them. Especially muffins, or little items, I'm so curious to find out if it turned out good. I made up the new muffins and ate one (I had the WWPP for it, so no problem), so good. So much, much better than before! The nuttyness of the oat and quinoa together was very mild, but went so well with the pumpkin. I'm so happy with the new results that I plan on taking them to a ladies afternoon event with me.

Spurred on by my success I started working on my sandwich bread. I'm so close. The last loaf I made was almost as good as the wheat infested stuff. It just had a little too much egg in it. Also the book I'm adapting the recipe from, the lady likes to 'spread' her dough, and the loafs never look nice if you do this, so I have my own method. It came to me on my way to work. It's worked very well. You can spread if you want, but your bread will not look nice and round and it probably won't rise up as good.

Now I know I just got done saying not to have a 'generic mix' but I do have a basic mix that I keep around to help make baking easier and faster. This is for when I want to make up some rolls or pizza dough at night and I am tired. I just don't use it all the time.

Basic Gluten Free Gluten Rice Mix

6 oz. Thai rice flour
3 oz. potato starch
3 oz. tapioca flour
2.4 oz. OrGran Gluten Substitute

I would not recommend mixing home milled whole grains, as they need to be frozen and used quickly to prevent them from going bad. Just make up your basic mix and supplement as needed. Also, this is done by weight so the amount of gums in your mix will be the correct amount. I would recommend to any GF baker: just get a scale and quit whining.

Buttermilk GF Sandwich Bread

Ingredients:

1 C. GFG rice mix
1/2 C. oat flour
1/2 C. quinoa flour
1/8 C. tapioca flour
1/8 C. potato starch
.8 oz OrGran Gluten Substitute
2/3 tsp. kosher salt
2 Tbs. unbleached sugar
1 Tbs. dry active yeast
2 tsp. baking powder
1 large egg
3 Tbs. canola oil
3/4 cup + a little extra(about 2 tbs) warmed buttermilk
extra flour for dusting work surface


Method:

Grease a smaller bread pan.
Mix all of the dry ingredients together in a stand mixer. Even the yeast. Whisk the wet together and pour into your off stand mixer. Turn the mixer on low till the wet and dry are just mixed. Turn the speed up a bit and mix until you have a smooth mixture. It's not really a dough, and not really a batter. Prep your work surface with flour and put the mixture on the flour. Pat it into a loaf and coat in flour. Put into the pan and let this rise for about an hour. After 45 minutes or whenever the appropriate time is turn the oven onto 350 degrees and then bake your bread for about an hour. Remove from the pan and cool on a rack.

Slice and enjoy!

Wednesday, October 26, 2011

Look at the size of those muffins.

Having to cut wheat of your diet is really obnoxious. On one hand I do feel better and my blood sugar is at a constant level, on the hand I am having to learn how to bake again. This is very frustrating as I used to be able to whip up delightful baked goods without thinking about it. Now I have to research and test and hope and most of the time just fail.

I bought two gluten free cookbooks. They are clearly for beginners, which is what I am all of a sudden. Neither of them focuses on healthy cooking, just delicious cooking. I am all for that, and GF breads cannot be made just whilly nilly, as it turns out. However, I cannot be consuming giant sugar filled muffins if I want to fit into my pants!

I have had some triumphs: I can make pizza dough (hooray), rolls, cupcakes, muffins and hopefully soon: sandwich bread. I know you can buy these things, but honestly, they suck. They're dry and really expensive. They go bad quickly and they come in the smallest sizes. Five dollars for what is basically 2/3 of a loaf of bread, that's dry before you get it. Blah. I'd rather go without.

I made some pumpkin muffins today, based on a recipe in one of my cookbooks. As I was looking at the recipe I was shocked. It makes 12 muffins with like 1 1/2 cups of flours! I know that doesn't sound like a lot, but GFs go a lot farther, you need less of them to make the same amount of a wheat flour recipe. The recipe also had 2 cups of sugar in it! TWO! oof, they must be the sweetest muffins ever! I halved the sugar and they were plenty sweet, I think two cups would be over kill. Then the author goes onto say that these muffins are a 'snack'. Phhhhhffft! Snacks are not sugar- fat laden carb balls!

Now I don't know if I have the smallest muffin tin known to man, or other people are on purpose buying giant muffin tins, but whenever a recipe says it makes 12 muffins, I usually find that I can make 18 with that amount of batter. Who are these people and where are they buying their muffin tins?

I say to those of you who have to be gluten free - rise up! Make better for you baked goods. Just because something is GF doesn't mean it has to be bad! It also doesn't mean that it has to be super bad for you. We can have balance too! Force your gluten free prowess on others and make them tell you your GF products are delightful, without saying 'for a gluten free product'.

Gluten Free Pumpkin Muffins
makes 18 muffins
4 WWPP

Ingredients:

1/2 cup oat flour**
1 cup rice flour*
1/2 tsp xanthan gum
1 tsp baking soda
1/2 tsp baking powder
2 tsp pumpkin pie spice
1/3 cup canola oil
1 cup unbleached sugar
2 Tbs molasses
2 eggs
1 1/2 cups canned pumpkin

Topping:
1/2 tsp cinnamon in a tea steeper

Method:
Heat oven to 350, and prep muffin tins with liners. Mix all of the dry ingredients together in a bowl. Stir well. Whisk together all the wet ingredients in a different bowl. Add the wet to the dry and mix well by hand, being careful to not over mix. Fill muffin cups 1/2-2/3 full and sprinkle the cinnamon sugar in your tea steeper over the tops of the muffins. Bake for 20 minutes or until just done. Remove from oven and cool on rack.


* a quick note about rice flours. If you want finely ground, non-gritty rice flour you must buy it from an Asian grocery store. The Thai brands are the best, they are very finely ground, more finely ground than any American product. I know it's not local, but you need a quality product for this. They aren't gritty at all. The brand with the elephant on the front is the best.

**Also a note about oat flour. If you want a more ... stone filled whole wheat like texture feel free to follow directions from the internet about using your blender to make oat flour. I found this to be gritty and horrible, though quick. I'm going to call that the quick and dirty method. If you want a finely ground flour that feels like whole wheat flour use a mill. I have one for my stand mixer, truly an investment for any cook who cares about the quality of their oat flour.